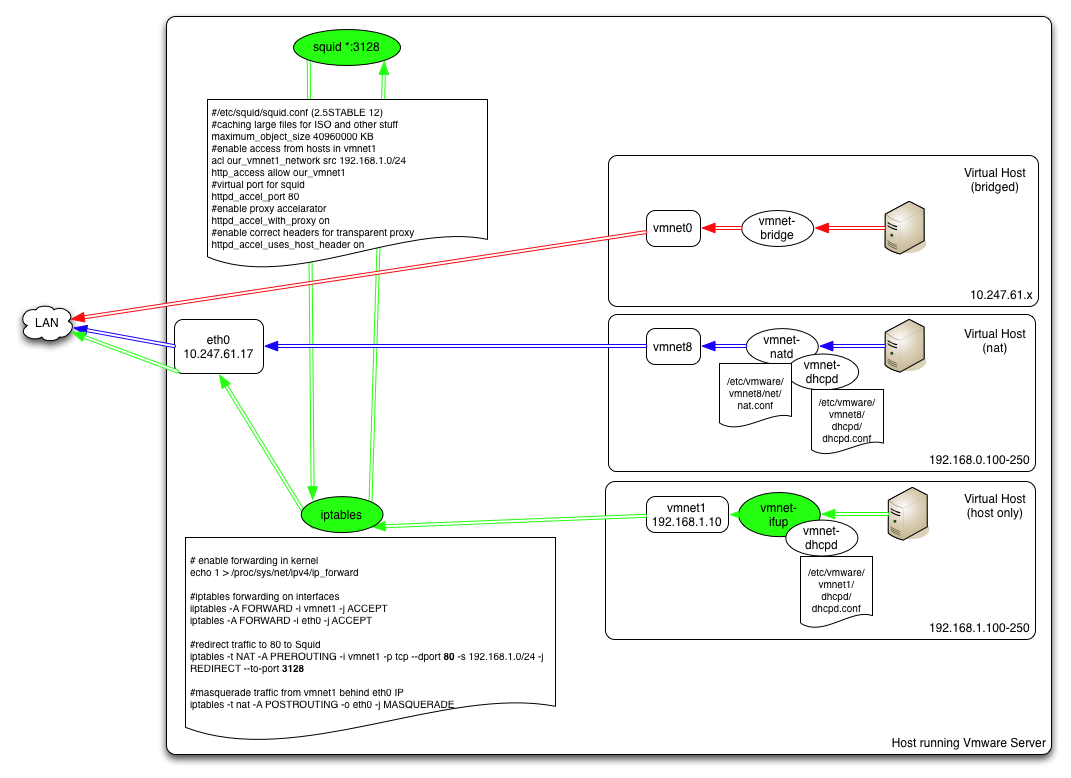
There are two options to have virtual machines use a Squid for proxying and caching downloads:
- Proxy: configure all applications such as yum, yast using their proxy setting f.i. using http_proxy env variable
- Transparant Proxy: use a transparent proxy server that automatically catches all traffic on port 80 and redirects it to a squid proxy
The most traditional approach for implementing option 2 is by setting up a squid box somewhere in the network and have a system where all the traffic passes redirect traffic to that box. While this is certainly a recommended setup, it does requires an additional box to do the job. In this solution the squid will be running on the box hosting all the vmware machines.

But first things first, lets install squid (we used 2.5Stable 12). More info at http://www.wains.be/index.php/2006/12/18/transparent-squid/
# yum install squid
Edit the config (/etc/squid/squid.conf) to make it act as caching proxy
#caching large files for ISO and other stuff maximum_object_size 40960000 KB #enable access from hosts in vmnet1 acl our_vmnet1_network src 192.168.1.0/24 http_access allow our_vmnet1 #virtual port for squid httpd_accel_port 80 #enable proxy accelarator httpd_accel_with_proxy on #enable correct headers for transparent proxy httpd_accel_uses_host_header on
And then start squid
#/etc/init.d/squid start
and logs go into /var/squid/access.log
So what are our options for the virtual machines networking?
- Using a bridged network: bridging makes virtual machines appear on the same network as the server hosting the virtual machines, so vmnet0 will be on the same network as eth0
- Using a NAT network: the nat interface of vmware actually is maintained by the vmnet-natd process. Traffic does not passes the network stack so that we can change it with iptables Redirect
- Using a Host-Only network: this is normally not an option because traffic on a host-only network interface is supposed not to leave the box. Still we can make this to work with a bit of extra work.
Step 0: make vmnet1 available so that we can use it at the vmware server level
# vmnet-netifup -d /var/run/vmnet1.pid /dev/vmnet1 vmnet1
now vmnet1 shows up if we do an ifconfig vmnet1 and give it the IP
Step 1: setting the correct gateway and DNS settings for vmnet1
As vmnet1 normally does not have a gateway, the /etc/vmware/vmnet1/dhcpd/dhcpd.conf does not contain the following settings
option domain-name-servers IP-from-your-DNS; option domain-name "your-domain.com"; option routers 192.168.1.10;
The 192.168.1.10 is the IP address you assigned using the manual ipconfig . It has nothing todo with the vmnet1 ip-address that you during the vmware-config.pl to your vmnet1 interface. See /etc/vmware/config, vmnet1.hostonlyaddress= "192.168.1.1" setting.
Step 2: enable forwarding
now that we have two interface we can play with, we can enable the forwarding
# echo 1 > /proc/sys/net/ipv4/ip_forward # iptables -A FORWARD -i vmnet1 -j ACCEPT # iptables -A FORWARD -i eth0 -j ACCEPT
Step 3: redirect traffic on destination port 80 to 3128 (Squid)
# iptables -t nat -A PREROUTING -i vmnet1 -p tcp --dport 80 -s 192.168.1.0/24 -j REDIRECT --to-port 3128
Step 4: masquerade traffic coming from virtual
# iptables -t nat -A POSTROUTING -o eth2 -j MASQUERADE
Step 5: if you're using a firewall check that you enabled port 3128
# iptables -L -t nat
# iptables -L
errors will go into /var/log/firewall
Now check that when your hosts go the internet, their accesses are logged in the /var/squid/access.log
P.S. While the whole excercise was done to cache f.i. yum and other packages during installation, I found that most of the repositories don't play nicely with the http-headers thereby causing MISSES in the cache.


